Monday 28 September 2015

Maybelline Hypersharp Wing Liner Tutorial

Hi everyone! Today I'm going to show you a couple of ways to use the new Maybelline Hypersharp Wing liquid liner. This has quickly become my favourite product to use to create winged eyeliner and is definitely the easiest to use.


The eyeliner has a tapered tip, and is flat, so it can be used with the thin side, or the wider, thick side to create a thick or thin line. Another bonus is that the flat side is the "shape" of a wing, and it can be used to directly create a wing or the basis of a wing, making it easy to get a quick & easy wing. I will show you how to do this below.


Thick/flat side

Thin side

Thin side above, thick side below

Thin wing

The thin side can be used to create a thin line on the lash line as well as to create a thin or long, sharp wing.


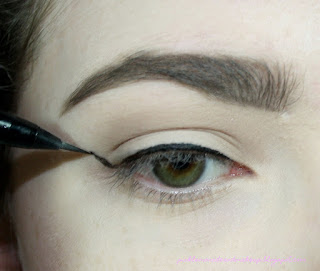
To use the thin side to create a wing, I first draw the outline of the wing before filling it in. To do this, I line my top lash line, then I draw the bottom line first, extending it from the "line" of my lower lash line and connecting it to the liner I already have on my top lash line.


Then I draw the upper line of the wing, connecting it to the liner on my lash line to the bottom wing line. I choose how high I make it depending on how thick I want the wing.


Then I just fill in the wing using the thicker side, and clean it up with the thin side.


Thick wing (fast & easy)

To make a thicker but super fast and easy wing, I use the thick side of the liner.

First I line my top lash line. The flat side can create a thicker but still neat line.


Next, I position the tip of the liner where I want the wing to end, The flat side facing my face. Keep in mind that this type of wing will be quite thick, so a shorter wing is probably the best option.


Then I press down the liner, using the flat side, starting at the tip then dragging it towards my lash line. Due to the shape of the brush it should leave you with a nice wing.


 Next I just clean it up using the thinner side of the brush. This is not always a necessary step, but if it is a little messy, or you want to extend your wing or sharpen the end, you can do so.

Final result

After adding some mascara and falsies, I have the perfect, quick wing! I love using this liner for when I don't have a lot of time to get ready but feel like wearing a wing.


I hope this was a helpful tutorial! I definitely recommend picking up this product if you are just starting out with winged eyeliner, want an easy and/or quick way to wing your eyes, or are just looking for a new liquid eyeliner!


- Ella

Friday 4 September 2015

Models Prefer Contour Collection Review

Hi everyone! I recently bought the new Models Prefer Contour/Collection - Ultimate Highlighting & Contouring Palette and thought I'd give you a review.


Contouring is very on-trend at the moment, and a lot of contouring palettes have come out. The Anastasia Beverley Hills and Australis contour palettes are the two which are probably most comparable to this palette in terms of the shades, although I have not tried them out myself.


I wasn't sure whether to get the Australis palette, especially after the quite negative reveiws (although it has supposed to come out with a better formula now), so when I saw that this palette had come out, getting very positive reviews and for the same price at AU$16.95, I jumped right onto it, and I'm glad I did.


Front of box

Back of box


The palette comes with a handy little booklet about how to use the kit depending on your skin tone and face shape and some other tips. The palette also comes with a big mirror inside which is actually useful.


Although admittedly the shades aren't all perfect for my fair skin, I manage to find a use for most of them. They are all matte shades apart from one, the shimmery highlighter, and come in warm and cool tones.


Highlight 1 -  This is the lightest shade, and is a light cool toned powder. The powder is just about the same colour as my skin so for me it works best as a setting powder.

Highlight 2 - This is a yellow shade, which is usually meant for under the eyes. The colour is very yellow so if you put too much on it can look strange, but blended lightly under the eye works quite well to cancel out and brighten under eye circles.

Highlight 3 - This is my favourite highlight shade. This one is an actual shimmery highlighter rather than a matte powder. Although it looks quite dark I still really like it even on my super fair skin. It blends out to just give a nice glow, and I think it would work on any skin tone.

Contour 4 - This shade is a slightly warm dark brown, and is what I use for light bronzing. All the powders in the kit blend out really well, and this shade is not too orange so it works well on my skin tone.

Contour 5 - I absolutely love this shade for contouring. It is cool toned so gives a nice shadowey affect and carves out my cheek bones nicely. It is a perfect contour shade for fair skin.

Contour 6 - This is the only shade out of the palette that I haven't actually used. It is very warm and quite dark, so would probably work best for bronzing on medium skin tones.


Swatches shades 1-6 (L-R)

Flash


No flash


Rundown

think this palette is a very good, versatile palette. Although the shades are not all perfect for my skin, I still manage to find a use for most of them. The shades are all quite light, so I would say this palette would work for fair to medium skin tones, and not really anything darker than that. Hopefully they will release a darker palette like Australis has because this is such a great kit! The powders are relatively pigmented but still very blendable. 

Pros: pigmented, blendable, versatile, affordable
Cons: suitable only for lighter skin tones, not necessarily all usable

Rating: 4/5

Thanks for reading! Let me know your thoughts.

- Ella

P.S. if you would like to follow me on Bloglovin', you can do so here. :)